How to visualize a Spring Integration graph with Neo4j?
Building a bridge from enterprise Java to graph databases
Spring Integration framework is able to represent the current state of all EIP components and their relations in the form of a JSON graph. It seems useful for learning and debugging but unfortunately none of the googleable tools (which are just 1st and 2nd) gives enough flexibility for visualization and analysis of such a graph. In this article I’ll show you how to address this problem by importing the graph into the Neo4j graph database where such abilities are the first class citizens.
TL;DR (for the impatient)
Short story long, all you need to do is:
- Provide the graph output in JSON format from a known URL;
- Execute this Cypher script in the Neo4j Browser (pasting the URL).
Hope this would be enough. If not, welcome the rest of the article.
Obtaining the graph as JSON
There are 2 complementary ways to get the graph from a running application:
- If using the
spring-integration-http(orspring-integration-webflux) module, then the graph can be obtained from the Integration Graph Controller. - If using
spring-integration-coretogether with Spring Boot Actuator, then the graph can be obtained from the Actuator’sintegrationgraphendpoint (which is not available from the web by default).
In both cases the response should look like:
{
  "contentDescriptor": {
    "providerVersion": "5.2.4.RELEASE",
    "providerFormatVersion": 1.1,
    "provider": "spring-integration",
    "name": "analog"
  },
  "nodes": [
    {
      "nodeId": 3,
      "componentType": "ExecutorSubscribableChannel",
      "name": "brokerChannel"
    },
    // ...
  ],
  "links": [
    {
      "from": 19,
      "to": 8,
      "type": "output"
    },
    // ...
  ]
}
There are always 3 fields on the top level: a single object named contentDescriptor and two arrays named nodes and links for vertices and edges accordingly. The idea behind this representation is quite straightforward: from and to fields of each element in the links array refer to the nodeId field of certain elements in the nodes array. The graph’s model is described in detail in the corresponding chapter of Spring Integration documentation.
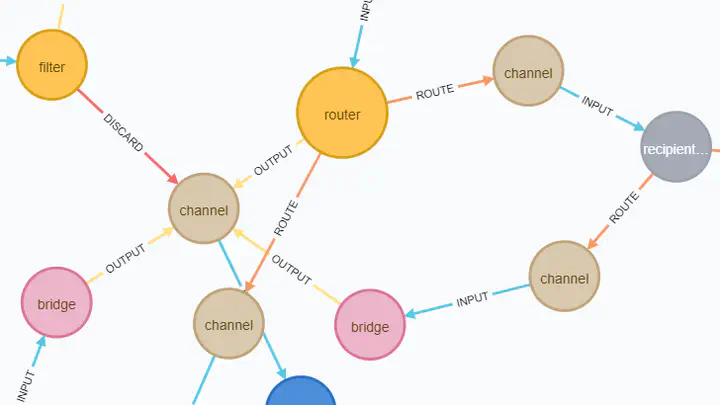
Note that channels (in terms of EIP) are not edges in the graph.
Instead, they are just vertices much like adapters, filters, etc, though their componentType values usually end with “channel” suffix.
Just in case
Before fetching the graph right from Neo4j database, I’d recommend you to do it from something simpler, say, from your web browser by means of navigating to http://localhost:8080/actuator/integrationgraph (in case of Spring Boot Actuator). If the response is not similar to the JSON shown above, then there’s no sense to proceed, we must fix the problem right here.
Usually the reason is either CORS restrictions or unavailability of the graph producing component. If you have a locally deployed application on Spring Boot Actuator, then both issues can be eliminated by adding the following lines into the application configuration:
management:
  endpoints:
    web:
      exposure:
        include: '*'
      cors:
        allowed-origins: '*'
        allowed-methods: '*'
(but please don’t do this in production! 🙏)
And if your application uses pure Spring Integration, see this page of the documentation.
Importing the graph into Neo4j
Prerequisites
To upload the graph into the graph database we need just 2 things:
- Neo4j DBMS itself (unexpectedly, isn’t it?)
Any free distribution is suitable:- Developer-friendly Neo4j Desktop
- Nothing-extra Neo4j Community Server
- For-the-lazy Neo4j Sandbox (no installation required)
- APOC – a set of useful Cypher procedures
This is de-facto standard library from Neo4j authors so that you can find and install it right from the official site. Cloud-hosted Neo4j Sandbox already has the library pre-installed.
This article is using Neo4j version 4.0.1. But since we don’t rely on any database internals here, everything should work on other versions as well.1 If installing APOC manually, please ensure that its first 2 digits of the version (e.g. 4.0) are equal to the same digits of Neo4j itself.
Visualization concerns
Since the JSON provided by Spring Integration contains all the info required for visualization, we could have taken it “as is” (nodes to vertices, links to edges, nested fields to properties) and translated it into the Cypher script to produce exactly the same graph in Neo4j. Then, if we execute the script with this example in the Neo4j Browser, the result might look like:
That’s not bad but far from perfect because:
- Almost all nodes are rendered with the same color and size so there is no sense in their visual appearance. Also, many node names start with the same prefix (e.g.
agentR) so that we have to hover over every node to see its full name in the status bar of the result panel. - All the edges have the same
Linklabel which is not informative at all. The real type of the link is hidden in the edge’stypeproperty. - There is no relation between the descriptor and the nodes it describes.
With these observations in mind, we can make our nodes and links more informative by providing them with visual distinction, depending on their type. For this, we can leverage the Neo4j Browser’s support of Graph Style Sheets (GraSS) – CSS-like files describing color, size (but not shape) and other visual properties of graph vertices and edges. This article comes with an example of such a file for Spring Integration graphs.
However, it’s not a trivial task because those visual properties in GraSS files are bound to nodes’ labels and links’ types but not to the properties of either. Since we now have the same node label and the same link type for all graph elements, we can’t use distinct styling. Of course, we should use different labels for nodes (depending on their componentType field) and different types for links (depending on their type field) to overcome the restriction, but it is not trivial either. The thing is, “out-of-the-box” Cypher language does not allow to generate neither vertex labels nor edge types dynamically, e.g. those values must be specified before the script is executed. It’s bad news because we get to know our nodes and links just after the JSON gets loaded which is a part of our Cypher script. The good news, however, is that the APOC library has apoc.merge.node and apoc.merge.relationship procedures2 that can create/update nodes and links by taking the labels (types) as variables:
apoc.merge.node– merge nodes with dynamic labels, with support for setting properties ON CREATE or ON MATCH
apoc.merge.relationship– merge relationship with dynamic type, with support for setting properties ON CREATE or ON MATCH1
Sounds great, doesn’t it? Yes, in general. But speaking of nodes we should be careful, there shouldn’t be too many distinct labels as they can make the graph a variegated mess of different-sized circles. To prevent this, we’ll provide our script with a filter stage that will “collapse” similar EIP-types to a general form, for example, all channel varieties to a single channel label. This can be achieved with the Cypher CASE expression.
At last, in our new script we’ll connect the descriptor node to all other nodes to make it easy to understand which graph elements it describes. This will also allow us to store multiple graphs in the same database independently.
The importing script
So, if we translate the above into Cypher language, the result may look like:3
// (1) load JSON from URL:
WITH "http://localhost:8080/actuator/integrationgraph" AS url
CALL apoc.load.json(url) YIELD value
WITH value AS json, value.contentDescriptor AS jsonDesc
// (2) descriptor:
MERGE (descriptor:Descriptor {name: jsonDesc.name})
  ON CREATE SET
    descriptor.providerVersion = jsonDesc.providerVersion,
    descriptor.providerFormatVersion = jsonDesc.providerFormatVersion,
    descriptor.provider = jsonDesc.provider,
    descriptor.updated = localdatetime()
  ON MATCH SET
    descriptor.updated = localdatetime()
// (3) nodes:
WITH json, descriptor
UNWIND json.nodes AS jsonNode
CALL apoc.merge.node(
  /*labels*/ ['Node',
    CASE
      WHEN jsonNode.componentType IS NULL THEN "<unknown>"
      WHEN toLower(jsonNode.componentType) ENDS WITH "channel" THEN "channel"
      WHEN toLower(jsonNode.componentType) ENDS WITH "adapter" THEN "adapter"
      WHEN jsonNode.componentType CONTAINS '$' THEN "<other>"
      ELSE jsonNode.componentType
    END],
  /*identProps*/   {nodeId: jsonNode.nodeId, appName: descriptor.name},
  /*onCreateProps*/{name: jsonNode.name, componentType: jsonNode.componentType},
  /*onMatchProps*/ {}
) YIELD node
MERGE (descriptor)-[:DESCRIBES]->(node)
// (4) links:
WITH json, descriptor, node
UNWIND json.links AS jsonLink
MATCH (a:Node {nodeId: jsonLink.from})<-[:DESCRIBES]-(descriptor)-[:DESCRIBES]->(b:Node {nodeId: jsonLink.to})
CALL apoc.merge.relationship(a, toUpper(jsonLink.type), {}, {}, b, {}) YIELD rel
// (5) result:
RETURN descriptor
Skipping the details of Cypher syntax, let’s review the parts of this script following their numbers in comments:
First we use the
apoc.load.json(url)procedure from the APOC library to fetch raw JSON from inside the script. Here we also introduce a couple of aliases by means of theWITHclause for brevity.Create or update the
Descriptornode from corresponding JSON object and literally transfer all the properties. Additionally setupdatedproperty to save the timestamp of the last modification (just for convenience).Create/update each node assigning 2 labels: the first one with the
Nodevalue (just to keep something in common between all nodes) and the second one with a value chosen as:unknown, if corresponding JSON node has nocomponentTypefield (which is abnormal but still happens e.g. withUnzipTransformerEIP component);channel, if the full component type value ends with a “channel” suffix likeExecutorSubscribableChannel;adapter, if it ends with “adapter” likeinbound-channel-adapter;<other>, if the type contains a$character which denotes anonymous class with a dynamic (thus useless for us) name likeServerConfig$$Lambda$994/0x00000008010fd440;- the value of the
componentTypefield itself, if none of the conditions above match.
Note that we also keep the original value of each component type in the like-named property in order to support searching through the graph by exact matching. Here we also connect the descriptor to each newly created node.
Create/update links choosing the type from the JSON’s
typefield and casting it to upper case as the best practices recommended.
Note that whenMATCHing nodes to connect, we also specify their relations to the descriptor. This is needed just to prevent the mess when storing multiple graphs in the same database. Otherwise, these relations (as well asappNameproperty of nodes) can be omitted.Return the descriptor as the result of the whole script.
Of course, it might be better to return the graph at whole but for some reason it made the script execution substantially slower in all of my tests. A subject to research.
Depending on the Spring Integration graph size, the execution of the script can take significant time (couple of dozens of seconds on my developer machine for a graph with 350+ nodes and 330+ links, see it below). It heavily depends on RAM volume available to Neo4j. You can tune it with built-in bin/neo4j-admin memrec command.
Remember that we should also apply the graph styling by dragging a GraSS file (e.g. this one) to Neo4j Browser’s panel opened with :style command.
Graph visualization
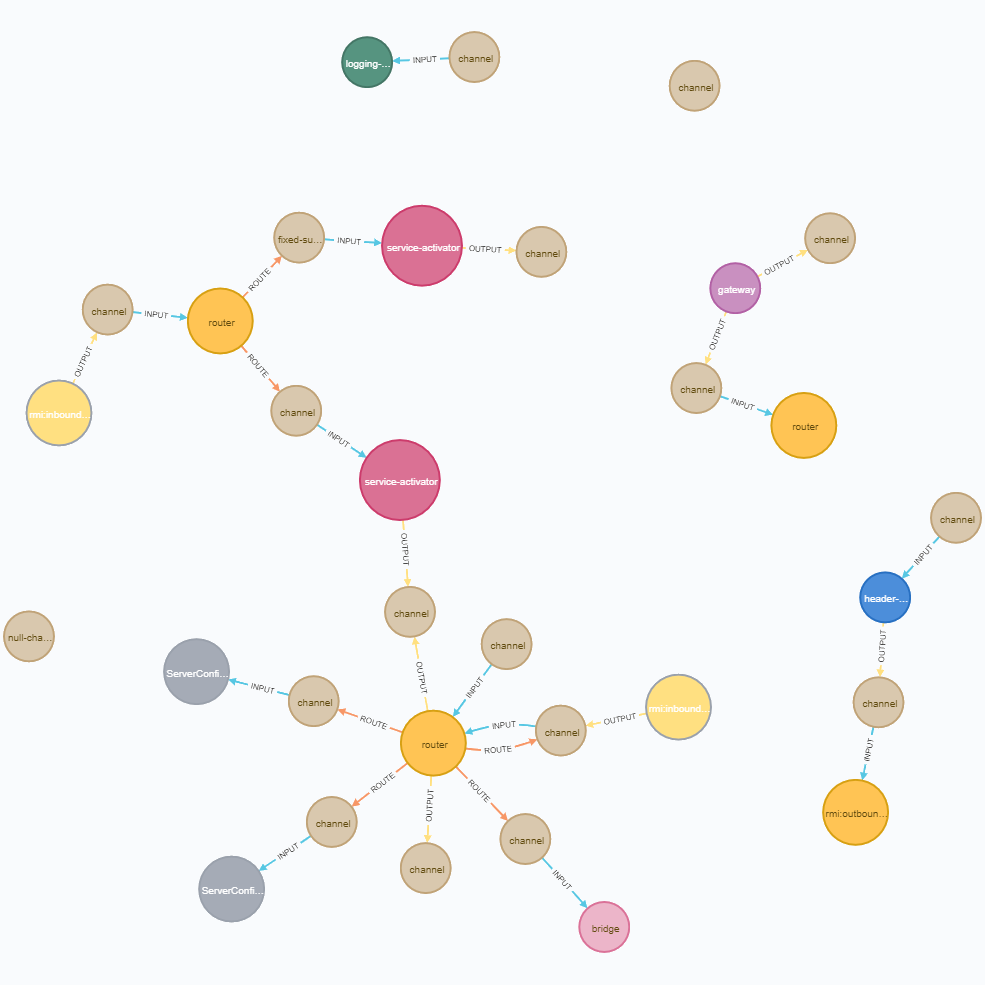
When all is said and done, we can finally ask the Neo4j Browser to build the visual representation of our graph. In case of a single graph it can be as simple as MATCH (a) RETURN a query. But in a general case it would be better to consciously select all the nodes and links that have relations to a particular descriptor defined by the application name, e.g.:
WITH "analog" AS appName
MATCH (:Descriptor {name: appName})-[:DESCRIBES]->(n:Node)-[l*0..1]-(:Node)
RETURN n, l
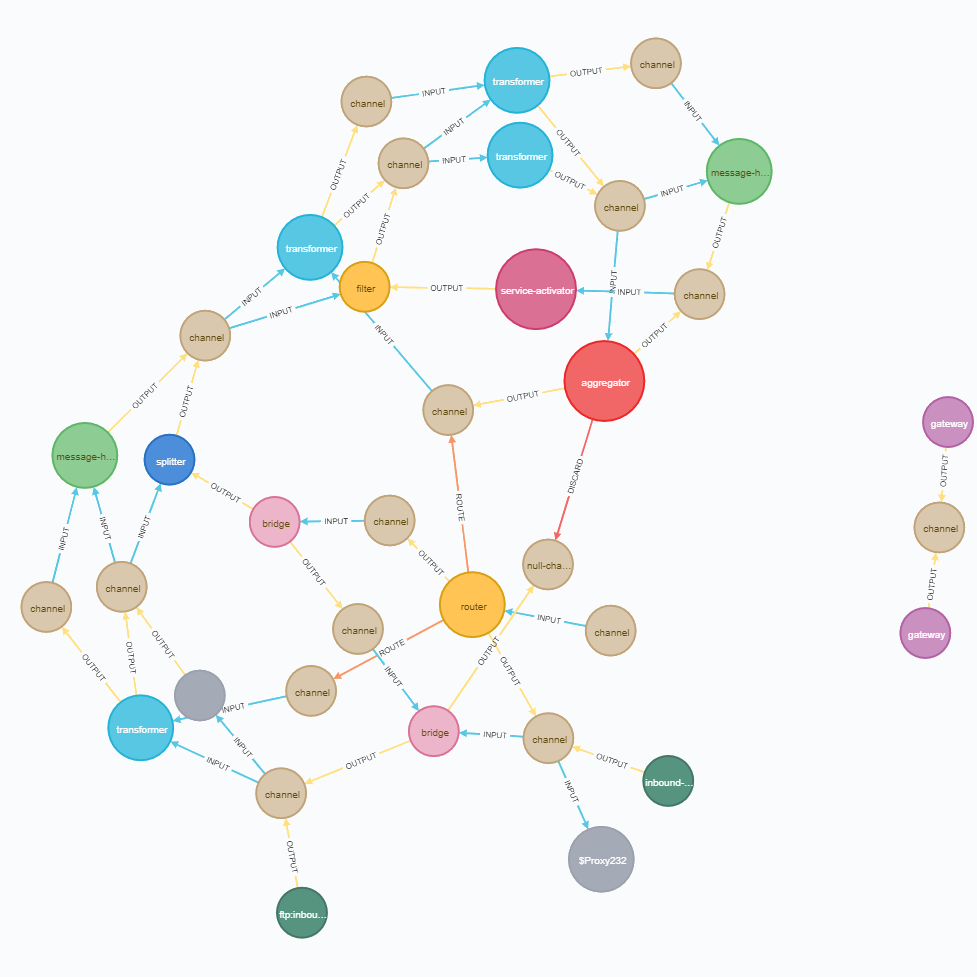
For the same sample graph the result may look like:
Note that apart from colors and sizes this graph version employs a componentType property as node name instead of name property. This makes nodes more readable (because types are usually shorter than names) but requires the graph user to hover over each node to find out its full name. This can be changed with Node label visual properties either from the Neo4j Browser UI or from the GraSS file:
node.Node {
  defaultCaption: "<id>";
  caption: "{name}";
}
If node names are changed back to name property, then the user should also look at the colors legend which is at the top of the Neo4j Browser’s result panel:

Now that we’ve enhanced the visual representation of the graph, it should become easy and fun to work with. If not, then this is probably a matter of the Neo4j Browser capabilities rather than graph representation itself. Fortunately, there are several alternative visualization tools compatible with Neo4j graph storage.
Additional examples
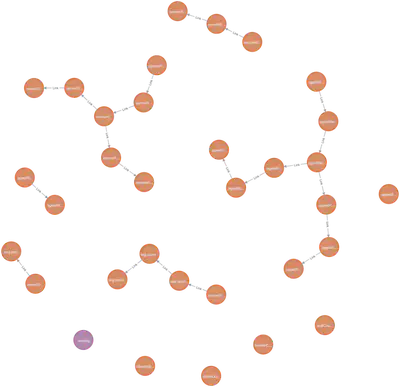
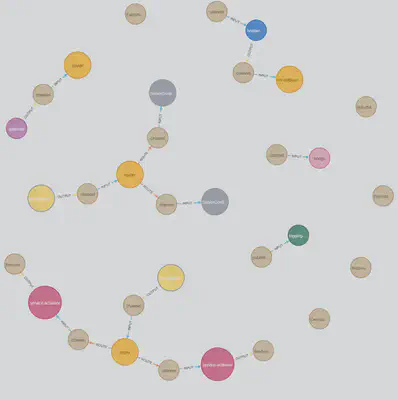
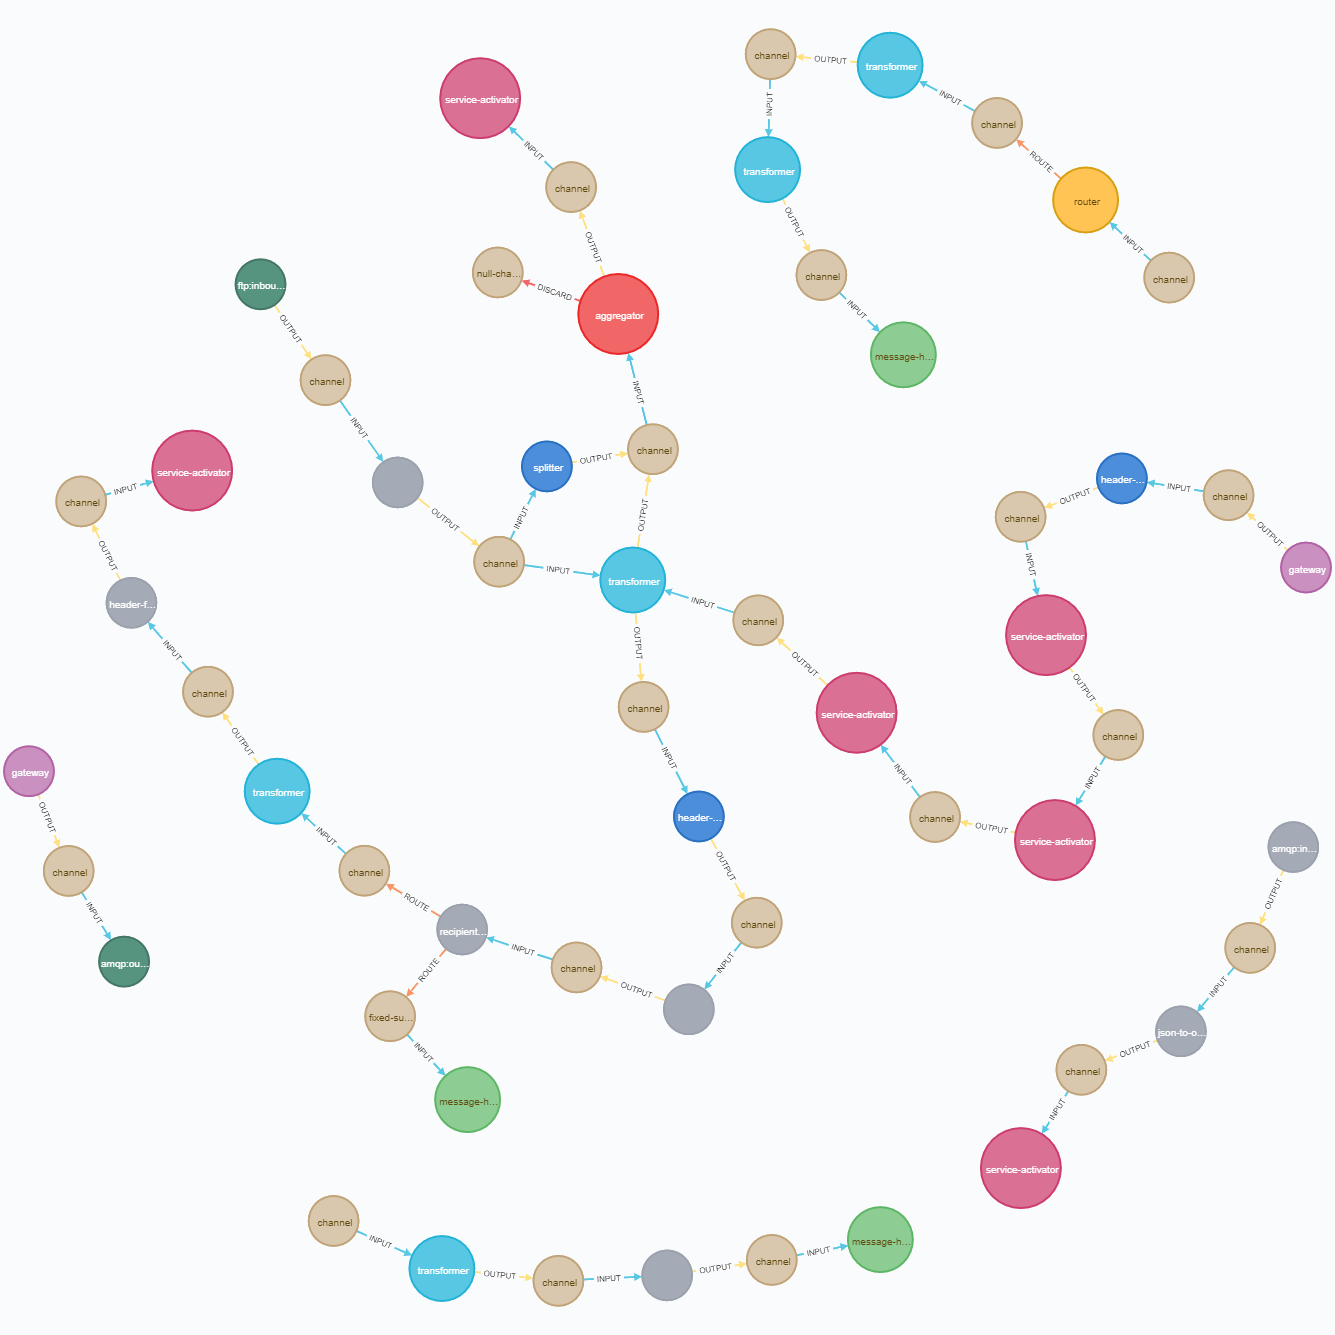
Being carefully applied, Neo4j can become a valuable helper for graph visualization of Spring Integration applications. This is especially useful when it comes to some complicated and/or confused graphs like I had occasions to meet:

Resume & Prospects
In this article we have learned how to obtain a JSON graph of EIP components from a Spring Integration application. We’ve also defined prerequisites for Neo4j DBMS to import the graph to. Then we’ve outlined some concerns around the visualization. It helped us to compose a Cypher script for importing the graph into the Neo4j database. With this script in hand, we have used the Neo4j Browser to query and visualize the graph in different ways. At last, we’ve seen some examples of graphs built with the script.
While the script shown in this article is not ideal from many points of view, it can still serve as a starting point for building more sophisticated scripts ideally suited for particular tasks. It is also important to realize that visualization is definitely not the only benefit of using Neo4j with integration graphs. There are plenty of tasks that can be solved by leveraging graph algorithms. For example: find longest/shortest link chains, reveal unreachable parts, detect most dependent/important components (aka “bottle necks”), determine excess points, etc.
I would be glad to hear from you about any experience around Spring Integration and Neo4j collaboration. Please feel free to leave comments below and/or share the article with others to make it really helpful 👍
APOC procedures like
apoc.merge.(relationship|node)in their 3.x version (which is used in Neo4j Sandbox on April’20) do not supportonMatchPropsargument. Therefore it should be removed from the examples given here. ↩︎ ↩︎Hereinafter, we use
MERGEclause and procedures to make the script idempotent, i.e. repeatable without errors and duplicates. If it’s not required,CREATEclause and procedures can be used instead. ↩︎When executed on a remote Neo4j instance (e.g. in cloud Sandbox), the script will fail because of another meaning of
localhostthere. In this case you should either provide an external URL for the JSON graph source or (at least) use the URL of this example taken from my AnaLog application. ↩︎